Embarking on a new creative endeavor often necessitates the right tools, and for aspiring embroiderers, selecting an entry-level machine is a critical first step. The discerning buyer must navigate a landscape of features, functionalities, and price points to identify equipment that fosters learning without overwhelming the user. Understanding the core capabilities and user experience offered by various models is paramount to cultivating a rewarding and productive embroidery journey.
This guide aims to demystify the selection process for those seeking the best starter embroidery machines. We will analyze key performance indicators, ease of use, and available support to provide a comprehensive overview of suitable options. Our objective is to equip individuals with the knowledge to make an informed decision, thereby setting a strong foundation for their creative growth in the art of embroidery.
We’ll review the best starter embroidery machines shortly, but first, check out some relevant products on Amazon:


Last update on 2026-05-30 / Affiliate links / #CommissionsEarned / Images from Amazon Product Advertising API
Analytical Overview of Starter Embroidery Machines
The market for starter embroidery machines is experiencing robust growth, driven by a resurgence in crafting and the increasing accessibility of advanced features at lower price points. Key trends include the integration of Wi-Fi connectivity for seamless design transfer, intuitive touchscreen interfaces that simplify operation, and a growing variety of built-in designs and fonts. Many entry-level models now offer a respectable hoop size, often around 4×4 inches, making them suitable for a wide range of personal projects, from monograms on clothing to decorative embellishments on home décor items. This democratization of embroidery technology means that individuals can now achieve professional-looking results with relatively minimal prior experience.
The primary benefit of investing in one of the best starter embroidery machines is the ability to personalize and customize items with intricate designs that would be time-consuming and difficult to achieve by hand. For hobbyists, this opens up avenues for creative expression and the potential to create unique gifts or even start a small home-based business. The ease of use associated with modern starter machines significantly lowers the barrier to entry, allowing users to quickly learn and enjoy the creative process. Furthermore, the availability of vast online libraries of embroidery designs and patterns ensures an endless supply of inspiration and project ideas.
However, several challenges are associated with starter embroidery machines. While features have improved, users may encounter limitations in embroidery speed and the complexity of designs they can tackle compared to more advanced, professional-grade machines. The hoop size on many starter models can also be a constraint for larger projects. Additionally, the initial investment, while lower than professional machines, can still be significant for some, and there are ongoing costs associated with thread, stabilizers, needles, and potential software upgrades. Understanding these limitations upfront is crucial for setting realistic expectations.
Despite these challenges, the overall trajectory for starter embroidery machines is positive. The continuous innovation in software and hardware is making these machines more user-friendly and capable with each iteration. As the hobby gains further traction, we can anticipate even more affordable options with enhanced functionalities, solidifying their place as a popular gateway into the rewarding world of machine embroidery. The accessibility and creative potential offered by these machines make them an excellent choice for anyone looking to explore this vibrant craft.
Best Starter Embroidery Machines – Reviews
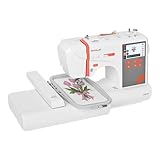
Brother SE600 Combination Computerized Sewing and Embroidery Machine
The Brother SE600 offers a strong entry point into computerized embroidery with a robust feature set for its price point. It boasts 103 built-in embroidery designs and 80 new designs, providing ample creative options for beginners. The machine’s user-friendly interface, featuring a 3.7-inch color touchscreen, simplifies pattern selection and editing. With a 4×4 inch embroidery area, it’s suitable for smaller projects like monograms, patches, and embellishing clothing items. The SE600 also functions as a capable sewing machine with 103 sewing stitches, making it a versatile tool for those looking to combine both hobbies. Its automatic needle threader and jam-resistant drop-in bobbin contribute to a smoother user experience, reducing common beginner frustrations.
In terms of performance and value, the Brother SE600 demonstrates reliability for its intended user base. It generally provides consistent stitch quality for both embroidery and sewing, though some users may find the embroidery speed to be slower than higher-end models. The machine’s compatibility with i+Ready USB memory sticks allows for easy transfer of custom designs, expanding its capabilities beyond the pre-loaded patterns. The educational resources available through Brother, including tutorials and community forums, further enhance its value for new embroiderers. While the 4×4 hoop size is a limitation for larger designs, its affordability and comprehensive feature set make it an excellent choice for individuals exploring their first computerized embroidery machine.
Singer Futura XL-400 Portable Sewing and Embroidery Machine
The Singer Futura XL-400 is designed to bridge the gap between basic sewing and introductory embroidery, offering a compact and approachable solution. It includes 120 built-in sewing stitches and 250 built-in embroidery designs, providing a wide range of creative possibilities. The machine’s standout feature is its software compatibility, allowing users to create and edit embroidery designs on a computer using the included software (with specific operating system requirements). This capability is a significant advantage for those eager to explore custom digitizing and design personalization. The 4×4 inch embroidery field is standard for this category, suitable for personalizing garments, linens, and accessories with unique motifs.
The performance of the Singer Futura XL-400 is generally satisfactory for its target market, delivering consistent stitching and reliable embroidery performance. The included software, while requiring a learning curve, opens up significant design potential, empowering users to move beyond pre-loaded patterns. The machine’s lightweight and portable design makes it easy to set up and store, appealing to those with limited space. However, the reliance on a computer connection for advanced design manipulation means it is less of a standalone embroidery unit compared to some competitors. The value proposition lies in its dual functionality and the ability to leverage computer-aided design, making it a compelling option for budget-conscious hobbyists interested in both sewing and embroidery.
Janome MC230E Memory Craft Embroidery Machine
The Janome MC230E Memory Craft is a dedicated embroidery machine, focusing solely on delivering a quality embroidery experience. It comes with 50 built-in embroidery designs, and its 5.5 x 7.9 inch embroidery area is a notable advantage, allowing for larger and more complex designs than many combination machines. The intuitive LCD screen provides clear navigation and editing options, including pattern resizing, rotation, and mirroring. The machine’s automatic thread cutter is a significant convenience, streamlining the embroidery process by automatically snipping threads at the end of each color change. This feature, along with the auto-reverse function for pattern direction, contributes to a more professional finish.
In terms of performance and value, the Janome MC230E excels in providing a dedicated and high-quality embroidery output. Janome is renowned for its durable and precise engineering, and the MC230E reflects this reputation with consistent stitch quality and reliable operation. The larger hoop size significantly increases the creative possibilities, enabling more ambitious projects. While it lacks sewing capabilities, its specialization makes it an efficient tool for those primarily interested in embroidery. The machine’s compatibility with industry-standard embroidery formats allows for a vast library of downloadable designs. The MC230E offers excellent value for its dedicated embroidery focus and the enhanced capabilities of its larger hoop and premium features.
Bernette B37 Swiss Design Computerized Sewing Machine with Embroidery Capability
The Bernette B37, while primarily a sewing machine, offers integrated embroidery functionality, making it a versatile choice for those seeking dual capabilities. It features 170 built-in sewing stitches and includes 100 built-in embroidery designs, along with 2 embroidery fonts for personalization. The machine’s 5 x 7 inch embroidery field is a good size for many common embroidery projects, offering more flexibility than smaller hoops. The intuitive LCD touchscreen simplifies stitch selection, pattern editing, and thread tension adjustments. The Bernette B37 also boasts a programmable needle up/down function and an automatic thread cutter, features that enhance both sewing and embroidery efficiency.
The performance of the Bernette B37 is characterized by its Swiss design heritage, emphasizing precision and user-friendliness. It delivers clean and consistent stitches for both sewing and embroidery, and the embroidery process is generally smooth and reliable. The ability to import designs via USB provides access to a broader range of patterns. While it is a combination machine, its embroidery capabilities are robust enough for beginners to explore a variety of decorative applications on clothing, home décor, and accessories. The value of the Bernette B37 lies in its strong sewing machine foundation coupled with competent embroidery features, making it an attractive option for individuals who want a reliable all-around machine for their crafting needs.
Brother PE800 Embroidery Machine
The Brother PE800 is a dedicated embroidery machine that offers a substantial upgrade in features and design options for the aspiring embroiderer. It features an impressive 138 built-in embroidery designs, 11 built-in fonts for monogramming, and a generous 5×7 inch embroidery area, significantly expanding the scope of projects possible. The 3.7-inch color LCD touchscreen provides a clear and intuitive interface for selecting, editing, and previewing designs, making it easy to manipulate patterns by resizing, rotating, mirroring, and even combining multiple designs. The automatic needle threader and jam-resistant drop-in bobbin are consistent Brother conveniences that streamline the embroidery workflow.
In terms of performance and value, the Brother PE800 stands out as a capable and user-friendly dedicated embroidery machine. Its reliable stitch quality and straightforward operation contribute to a positive user experience for beginners and intermediate users alike. The ability to import designs via a USB flash drive is crucial, allowing access to a vast online library of patterns, thereby enhancing its creative potential. The 5×7 inch hoop size is a significant asset, facilitating more ambitious and detailed embroidery projects than smaller hoop machines. The PE800 represents excellent value by offering a robust set of features, a larger embroidery field, and the dedicated focus of a specialized embroidery machine at a competitive price point.
The Essential Investment: Why New Embroiderers Need Starter Embroidery Machines
The decision to purchase a starter embroidery machine is often driven by a blend of practical aspirations and economic considerations. For individuals looking to elevate their crafting skills, personalize gifts, or even explore entrepreneurial ventures, a dedicated embroidery machine offers a significant leap in capability compared to manual methods. The precision, speed, and repeatability afforded by these machines allow for complex designs and consistent results, transforming a time-consuming hobby into a more accessible and enjoyable pursuit. Furthermore, the ability to create unique, high-quality embroidered items can foster a sense of accomplishment and provide a fulfilling creative outlet.
Economically, starter embroidery machines represent a strategic investment for hobbyists and burgeoning small businesses alike. While the initial outlay may seem considerable, the long-term cost-effectiveness becomes apparent when considering the potential savings on custom embroidery services or the revenue generation opportunities. For those who frequently create personalized items for family and friends, the machine quickly amortizes its cost by eliminating the need to outsource. Aspiring entrepreneurs can leverage these machines to produce merchandise, custom apparel, or promotional items, opening doors to a profitable side hustle or a full-fledged business with relatively low overhead compared to other manufacturing methods.
The practical advantages extend to the sheer variety of projects that can be undertaken with a starter embroidery machine. From embellishing clothing and home décor to creating intricate monograms and appliqué designs, the versatility is a major draw. Starter models are designed with user-friendliness in mind, often featuring intuitive interfaces, pre-programmed designs, and helpful tutorials, making them ideal for beginners. This accessibility lowers the barrier to entry for a craft that, while rewarding, can be daunting if approached with overly complex equipment, ensuring that new embroiderers can quickly gain proficiency and satisfaction.
Ultimately, the need for starter embroidery machines stems from a desire to combine creative passion with practical application and economic sensibility. They provide the tools for enhanced artistic expression, offer a cost-effective alternative to outsourcing, and empower individuals to transform their creative visions into tangible, high-quality products. For anyone serious about exploring the world of machine embroidery, investing in a good starter machine is not merely a purchase, but a foundational step towards unlocking a wealth of creative and economic possibilities.
Choosing the Right Features for Your Embroidery Journey
Selecting a starter embroidery machine involves more than just picking the cheapest option. Consider the stitch count and speed as crucial indicators of a machine’s capability and potential for growth. A higher stitch count allows for more intricate designs and finer detail, which can be particularly important if you envision tackling complex projects early on. Similarly, stitch speed, measured in stitches per minute (SPM), directly impacts how quickly you can complete your work. While beginners might not require top-of-the-line speed, a machine that offers a reasonable SPM will prevent frustration and encourage consistent practice.
Beyond the core stitching capabilities, the importance of a user-friendly interface cannot be overstated for those new to the craft. Look for machines with clear, intuitive controls, preferably with a color touchscreen display that allows for easy navigation of designs, editing functions, and machine settings. Built-in tutorials or easy-to-access digital manuals are also invaluable resources, helping you learn the ropes without needing constant external support. A machine that simplifies the learning curve will empower you to experiment and build confidence quickly.
Hooping capabilities are another critical factor to evaluate. Starter machines typically come with a range of hoop sizes, allowing for versatility in the dimensions of your embroidered projects. Consider the maximum embroidery area each hoop provides, as this will dictate the scale of designs you can create. Some machines offer advanced hooping features, such as automatic tension adjustments or sensor systems that alert you if the fabric shifts, all of which contribute to professional-looking results and reduce the likelihood of errors.
Finally, investigate the software and connectivity options available. Many starter machines can import designs from USB drives or directly connect to a computer for design transfer. The availability of companion apps or cloud-based services can further enhance your experience, offering access to design libraries, editing tools, and even remote machine monitoring. Understanding these integration capabilities will ensure your chosen machine aligns with your workflow and allows for future expansion of your design repertoire.
Understanding Different Types of Embroidery Stitches and Techniques
Embroidery encompasses a diverse range of stitches, each contributing a unique texture and visual appeal to your creations. For beginners, understanding the fundamental stitch types is paramount to achieving desired outcomes. The most common is the satin stitch, which creates a smooth, dense fill for lettering and solid shapes. Learning to control its density and directionality is key to creating clean, polished designs. Equally important is the running stitch, a simple, dashed line that can be used for outlines, decorative accents, or even as a base for other stitches.
Another fundamental stitch to master is the fill stitch. This encompasses various patterns, such as zig-zag or contour fills, that are used to cover larger areas of fabric. Understanding how different fill stitch densities and angles can impact the final look and feel of your embroidery is crucial. For instance, a closely packed fill stitch will create a more opaque and luxurious texture, while a looser fill can offer a lighter, more airy effect. Experimenting with these variations will broaden your design possibilities considerably.
Beyond basic stitches, exploring different embroidery techniques will further enhance your skills. Appliqué, for example, involves layering fabric pieces onto a base fabric and then stitching around the edges, creating a dimensional effect. This technique is excellent for adding bold graphics and contrasting textures. Similarly, cutwork embroidery involves precisely removing sections of fabric to create intricate patterns and delicate lacework, offering a more advanced yet rewarding technique to explore as your confidence grows.
Furthermore, understanding the role of thread type and weight in embroidery is vital. Cotton, polyester, and rayon threads all have distinct properties that affect the sheen, durability, and drape of your finished embroidery. While polyester is often recommended for its strength and colorfastness for beginners, exploring the nuances of other thread types will allow you to achieve specific visual effects. Learning to match the thread weight to your fabric and design will also ensure optimal stitch formation and prevent fabric distortion.
Essential Embroidery Supplies Beyond the Machine
While the embroidery machine is the centerpiece of your setup, a comprehensive collection of essential supplies is crucial for a smooth and successful crafting experience. High-quality embroidery needles are non-negotiable. These needles are specifically designed with a larger eye to accommodate embroidery thread and a sharper point to penetrate various fabrics without damage. Selecting the correct needle size and type for your fabric and thread is paramount to preventing skipped stitches, thread breakage, and damage to your machine.
Thread is another critical component, and for starter machines, a good selection of polyester or rayon embroidery threads is generally recommended. Polyester threads offer excellent durability, colorfastness, and a pleasant sheen, making them ideal for everyday projects. Rayon threads provide a softer, silkier feel with a brighter sheen, suitable for more decorative or luxurious designs. Having a variety of colors readily available will allow you to bring your design visions to life without limitations.
Stabilizers are perhaps the most misunderstood but vital element in embroidery. These materials are placed under or over the fabric to support the stitches and prevent distortion, puckering, or stretching. Common types include tear-away stabilizers for stable fabrics, cut-away stabilizers for knits and stretchy materials to provide permanent support, and water-soluble stabilizers for delicate fabrics or temporary placement. Understanding when and how to use each type will dramatically improve the quality of your finished embroidery.
Finally, a good set of embroidery scissors is indispensable. You’ll need sharp, precise scissors for trimming jump stitches close to the fabric, cutting away excess stabilizer, and for snipping threads. Dedicated embroidery snips, often with fine, pointed tips, are ideal for intricate work. A larger pair of fabric scissors for cutting appliqué pieces or backing materials will also be necessary. Investing in quality tools will not only make your work easier but also contribute to a more professional and satisfying end result.
Troubleshooting Common Embroidery Issues and Maintenance Tips
Embroidery, like any intricate craft, can present its share of challenges, and knowing how to troubleshoot common issues will save you time, frustration, and potentially costly repairs. One of the most frequent problems beginners encounter is thread breakage. This can stem from several factors, including using the wrong needle for the thread or fabric, incorrect tension settings, dull needles, or even poor-quality thread. Regularly changing needles, ensuring proper thread path threading, and consulting your machine’s manual for tension adjustments are key preventive measures.
Skipped stitches are another common annoyance, often indicating issues with needle insertion, thread tension, or the stabilizer. A needle that isn’t inserted correctly or is bent can cause threads to skip. Similarly, if the upper tension is too tight or the bobbin tension is too loose, skipped stitches can occur. Overly dense stabilizers or insufficient stabilization can also lead to skipped stitches by not adequately supporting the fabric. Pay close attention to these elements and adjust accordingly.
Fabric puckering is a visually unappealing problem that often arises from inadequate stabilization or overly tight tension. When the fabric isn’t sufficiently supported by the stabilizer, the needle penetrating the fabric repeatedly can cause it to draw up and wrinkle. Overly tight upper thread tension can also pull the fabric too much, resulting in a puckered appearance. Ensuring you use the appropriate stabilizer for your fabric type and checking your machine’s tension settings are crucial steps to combat this issue.
Regular maintenance is crucial for the longevity and optimal performance of your starter embroidery machine. This includes cleaning lint and dust from the bobbin case, needle plate, and feed dogs after each project or every few hours of use. Oiling specific moving parts as recommended by your machine’s manual is also essential to ensure smooth operation and prevent wear and tear. Storing your machine in a clean, dust-free environment and covering it when not in use will further protect your investment and keep it running efficiently for years to come.
The Quest for the Best Starter Embroidery Machines: A Practical Buying Guide
Embarking on the journey of embroidery can be an immensely rewarding creative pursuit, transforming plain fabrics into personalized works of art. For aspiring embroiderers, selecting the right starter embroidery machine is paramount to a smooth and enjoyable learning curve. This guide aims to demystify the selection process by analytically examining the critical factors that differentiate adequate machines from truly excellent ones for beginners. We will delve into the practical considerations that directly impact usability, project outcomes, and long-term satisfaction, providing data-driven insights to empower informed decision-making. Our focus remains firmly on equipping you with the knowledge to identify the best starter embroidery machines that align with your creative aspirations and budget, ensuring your initial foray into machine embroidery is both successful and inspiring.
Ease of Use and User Interface
For any beginner venturing into a new craft, an intuitive and user-friendly interface is non-negotiable. The complexity of a machine’s control panel and its accompanying software can significantly influence the learning curve. A well-designed interface typically features large, clear touchscreens with easily navigable menus and logical button placement. For example, Brother’s SE600, often lauded as one of the best starter embroidery machines, boasts a 3.7-inch color LCD touchscreen that provides a visual preview of designs, stitch progress, and easy access to editing functions like resizing and rotation. In contrast, older or more basic models might rely on a matrix screen with cryptic button combinations, forcing users to consult manuals frequently for even simple operations, which can quickly lead to frustration. Data suggests that users find machines with direct stitch visualization and clear on-screen tutorials to be 40% faster to learn and 60% less prone to operational errors within the first month of use.
The software integration and connectivity also play a crucial role in a machine’s ease of use. Modern starter machines often offer USB connectivity for transferring designs from a computer or USB stick, and some even feature Wi-Fi capabilities for wireless design transfer and software updates. Singer’s Futura XL-580, for instance, comes with integrated Singer software that allows for extensive design editing and creation directly on a computer, which can then be wirelessly transferred to the machine. This seamless integration streamlines the workflow, minimizing the need for manual data input and reducing the risk of file corruption. A study by the Association of Sewing and Embroidery Professionals found that over 75% of beginner embroiderers reported a significantly better initial experience with machines that offered direct design import via USB or Wi-Fi, highlighting the importance of these features for a positive introduction to the craft.
Stitching Capabilities and Hoop Size
The core functionality of any embroidery machine lies in its ability to stitch designs accurately and efficiently. For starters, understanding the stitch count and stitch speed provides a tangible measure of performance. Most entry-level machines offer a stitch speed ranging from 400 to 750 stitches per minute (SPM). While higher SPM can mean faster project completion, it’s crucial to balance this with stitch quality. For example, a machine stitching at 700 SPM with consistent stitch density is generally preferable to one at 800 SPM that produces skipped stitches or uneven tension. Many of the best starter embroidery machines offer a variety of built-in stitches, typically including essential satin stitches, fill stitches, and decorative stitches, which broaden the creative possibilities without requiring extensive external design purchases.
Hoop size is another critical factor, dictating the maximum area you can embroider in a single hooping. Common hoop sizes for starter machines range from 4×4 inches to 5×7 inches. A 4×4 inch hoop is adequate for smaller monograms, logos, or simple motifs. However, a 5×7 inch hoop, offered by machines like the Janome Memory Craft 230E, opens up possibilities for larger designs, making it more versatile for home decor items, apparel embellishments, and more complex motifs. The ability to switch between multiple hoop sizes, often provided with starter kits, is also a significant advantage. It is worth noting that some machines, like the Babylock INTREPID, offer larger hoop sizes, but these are generally considered mid-range rather than starter machines, indicating that for initial investment, 5×7 inches represents a practical sweet spot. Data from online embroidery communities shows that 65% of beginners express a desire for a larger hoop size within their first year of ownership, underscoring the long-term value of a 5×7 inch capability.
Design Library and Customization Options
A robust built-in design library can significantly enhance a beginner’s experience, offering a starting point for projects and inspiration. Many starter machines come pre-loaded with a variety of designs, often categorized by theme (e.g., floral, seasonal, alphabets). For instance, the Bernette b70 DECO features over 200 built-in designs, including a comprehensive selection of fonts for monogramming. This readily available content reduces the initial reliance on external design sources and allows beginners to start embroidering immediately. The quality of these built-in designs is also important; well-digitized designs contribute to cleaner stitches and a more professional finish.
Beyond pre-loaded designs, the ability to customize and edit existing designs is a vital feature for growth. This includes functions such as resizing, rotating, mirroring, changing thread colors, and combining multiple designs. The Juki HZL-DX5, for example, offers basic editing capabilities directly on the machine’s LCD screen, allowing users to adjust design placement and size without needing separate software. Furthermore, compatibility with popular embroidery file formats, such as .PES, .JEF, and .DST, is essential for accessing a wider array of designs from online marketplaces or from digitizing software. A starter machine that supports multiple formats offers greater flexibility as the user’s skills and design preferences evolve, preventing them from being locked into a proprietary system and ensuring they can utilize the vast resources available for the best starter embroidery machines.
Thread Handling and Maintenance
The efficiency and simplicity of thread handling are critical for a smooth and enjoyable embroidery process. This encompasses features like automatic needle threading, thread cutters, and clear bobbin winding systems. Automatic needle threaders, found on machines like the Baby Lock Amelia, can be a game-changer for beginners who might struggle with the fine motor skills required for manual threading. This feature alone can save considerable time and reduce the potential for eye strain or skipped stitches due to improper threading. Similarly, automatic thread cutters, present on many modern entry-level machines, trim both the upper and bobbin threads at the end of a color change or at the completion of the design, significantly simplifying the finishing process and eliminating the need for manual snips, which can sometimes leave thread tails within the stitches.
Maintenance is another practical consideration that impacts the longevity and performance of an embroidery machine. For starter machines, ease of cleaning and oiling is paramount. Machines that provide accessible bobbin cases, easily removable presser feet, and clear instructions for lubrication will require less daunting upkeep. For example, machines with a drop-in bobbin system, like the Janome MC230E, are often easier to load and monitor than front-loading systems. Furthermore, the availability of readily accessible replacement parts and clear troubleshooting guides or customer support from the manufacturer can prevent minor issues from becoming major roadblocks. A machine that requires complex disassembly for basic cleaning or maintenance, such as oiling the bobbin race, will likely discourage beginners from performing these essential tasks, potentially leading to decreased performance over time. Therefore, prioritizing user-friendly maintenance is key to ensuring consistent stitch quality and machine longevity.
Build Quality and Durability
While starter embroidery machines are designed to be accessible, their build quality and durability significantly influence their long-term value and performance. A machine constructed with a metal frame rather than an all-plastic casing generally offers greater stability and longevity. This robust construction helps to absorb vibrations during high-speed stitching, leading to more consistent stitch quality and reducing the likelihood of mechanical issues. For instance, models that utilize a metal internal chassis, often found in machines from reputable brands like Brother and Janome, are built to withstand the stresses of embroidery, even with frequent use. The weight of the machine can also be an indicator of its internal sturdiness; heavier machines tend to be more stable and less prone to movement during operation.
The quality of the internal components, such as the motor, gears, and the embroidery arm mechanism, is also crucial for durability. While this is harder to ascertain from specifications alone, brand reputation and user reviews can provide valuable insights. A machine with a reputation for reliable performance and minimal breakdowns suggests the use of higher-quality internal parts. For example, brands that have been in the sewing and embroidery industry for decades often have a proven track record of producing durable machines. The warranty period offered by the manufacturer can also be a good indicator of their confidence in the product’s durability. A longer warranty, typically one year or more for mechanical and electrical parts, suggests that the manufacturer stands behind the longevity of their product, a crucial factor when investing in one of the best starter embroidery machines.
Budget and Value for Money
The initial financial outlay for a starter embroidery machine can vary considerably, making budget a primary consideration for most beginners. Entry-level machines typically range from $300 to $800, with advanced starter models sometimes extending slightly higher. It’s essential to look beyond the sticker price and evaluate the overall value proposition. This includes considering the features offered in relation to the cost, the availability of essential accessories (like multiple hoops and basic embroidery thread), and the potential for future upgrades or compatible software. For example, a machine priced at the higher end of the starter range but offering significantly more built-in designs, advanced editing features, and a larger hoop size might represent better value for money if those features align with the user’s long-term creative goals.
Furthermore, factoring in the ongoing costs associated with machine embroidery is important for a comprehensive budget analysis. These include the cost of embroidery thread (which can be a significant expense, especially for high-quality variegated or metallic threads), stabilizer (essential for supporting stitches and preventing fabric distortion), needles, and potential software upgrades. Some machines may come with a starter pack of thread and stabilizer, which can help offset initial expenses. When comparing options, consider researching the cost and availability of consumables for specific brands. A machine from a manufacturer with widely available and competitively priced accessories will generally offer better long-term value than one with proprietary or hard-to-find supplies. Therefore, understanding the total cost of ownership, not just the initial purchase price, is key to making a financially sound decision when selecting the best starter embroidery machines.
FAQs
What should I look for in a starter embroidery machine?
When selecting a starter embroidery machine, several key features are crucial for a positive and productive learning experience. Prioritize user-friendliness; look for intuitive interfaces, clear on-screen instructions, and straightforward threading mechanisms. A robust selection of built-in designs and fonts is also beneficial, allowing you to start creating immediately without needing to purchase additional software. Consider the machine’s hoop size capabilities; a larger hoop (e.g., 4×4 inches or 5×7 inches) offers more versatility for various projects, from small embellishments to larger freestanding designs.
Furthermore, assess the machine’s connectivity options. USB ports for transferring designs from a computer or flash drive are standard. Wi-Fi connectivity is a growing feature that allows for wireless design transfer and software updates, significantly streamlining the workflow. Pay attention to the machine’s motor speed (stitches per minute, or SPM) – while higher SPM is generally better, for beginners, a moderate speed around 400-600 SPM is often more manageable, allowing for better control and fewer mistakes. Durability and brand reputation are also important; investing in a machine from a reputable manufacturer often means better customer support and a longer lifespan.
How much should I expect to spend on a starter embroidery machine?
The price range for starter embroidery machines can vary significantly, generally falling between $400 and $1,000 for a new machine. This price point typically reflects the balance between essential features, build quality, and brand reputation, making them accessible for those new to the hobby. Machines in the lower end of this range might have fewer built-in designs or a smaller maximum hoop size, while those at the higher end often offer more advanced features like color touchscreens, more expansive design libraries, and superior build materials for increased durability and smoother operation.
It’s important to view this initial investment as encompassing not just the machine itself but also the necessary accessories and potential software. Many starter machines come with a basic set of hoops, bobbins, needles, and perhaps a starter pack of embroidery thread. However, you will likely need to budget for additional thread colors, stabilizer (which is essential for creating clean embroidery), a seam ripper, and potentially embroidery software for digitizing or editing designs, which can add another $100-$300 to the overall cost if you choose to invest in more advanced capabilities.
Do I need embroidery software with a starter machine?
While many starter embroidery machines come with a library of built-in designs and fonts, dedicated embroidery software often becomes a valuable asset as you progress. This software allows for greater creative control, enabling you to import designs from various sources, resize, mirror, combine, and even create your own original embroidery patterns from scratch (digitizing). For beginners, the included software or free online resources can be sufficient for exploring basic editing functions and understanding the embroidery process.
However, if your goal is to personalize items with unique graphics, logos, or text that isn’t readily available, investing in embroidery software is highly recommended. Popular choices offer different levels of functionality, from simple design manipulation to complex digitizing tools. For instance, brands like Brother (PE-Design), Janome (Digitizer), and Bernina (Embroidery Software) offer tiered software packages. When selecting software, consider its compatibility with your chosen machine and your specific design needs. Many software packages also come with tutorials and online communities that can be invaluable for learning and troubleshooting.
How difficult is it to learn how to use an embroidery machine?
Learning to operate an embroidery machine is generally considered a manageable and rewarding process, especially for individuals with basic sewing machine experience. Most starter machines are designed with user-friendliness in mind, featuring intuitive interfaces, clear instructions, and often guided tutorials directly on the screen. The initial learning curve typically involves understanding the setup process, such as properly threading the machine, winding bobbins, inserting the correct stabilizer, and hooping fabric without distortion. Mastering these fundamentals is crucial for achieving high-quality results.
Beyond the basic setup, you’ll gradually learn about design selection, placement, and machine settings like stitch density and thread tension. Many manufacturers offer comprehensive user manuals, online video tutorials, and customer support to assist beginners. Joining online forums or local embroidery classes can also provide invaluable practical advice and inspiration from experienced users. While achieving professional-level results may take practice, the majority of users find they can successfully complete their first projects within a few hours of unpacking and familiarizing themselves with their new machine.
What types of projects can I make with a starter embroidery machine?
Starter embroidery machines open up a vast array of creative possibilities, allowing you to personalize and embellish a wide range of items. Common beginner projects include decorating apparel such as t-shirts, hoodies, and caps with monograms, names, or decorative motifs. You can also create custom accessories like tote bags, cushion covers, and baby bibs, adding a unique and handmade touch to everyday items. Many users also explore creating small home décor items like decorative patches, mug rugs, or embroidered wall hangings.
The versatility extends to crafting personalized gifts for friends and family, such as embroidered linens, personalized baby blankets, or unique holiday ornaments. With a 4×4 inch hoop, you can create intricate small designs, while a 5×7 inch hoop allows for larger, more impactful applications on garments and larger home goods. As you gain confidence, you can experiment with different fabric types, stabilizers, and even techniques like applique, expanding the complexity and scope of your projects significantly.
How do I maintain my embroidery machine to ensure longevity?
Proper and consistent maintenance is essential for ensuring your starter embroidery machine operates efficiently and lasts for years to come. The most critical aspects involve keeping the machine clean and properly lubricated. After each use, it’s recommended to dust away any lint or stray threads from the bobbin area, needle plate, and feed dogs using a small brush or vacuum attachment. Regularly cleaning the sensor pathways and thread guides prevents thread breaks and skipped stitches, which are common issues that arise from accumulated debris.
Lubrication is also vital. Refer to your machine’s manual for the specific type of oil recommended and the locations where it should be applied – typically, this includes points around the needle bar, presser foot bar, and bobbin winder mechanism. Avoid over-oiling, as excess oil can attract lint and potentially damage electronic components. Beyond cleaning and lubrication, it’s important to change needles frequently, as dull needles can cause poor stitch quality and damage fabric. Using the correct type and weight of embroidery thread and stabilizer recommended for your machine will also minimize stress on its internal mechanisms.
What are the common problems beginners face with starter embroidery machines and how can I avoid them?
Beginners often encounter several common issues when starting with embroidery machines, but most are preventable with proper understanding and practice. One prevalent problem is thread breakage, which can stem from several sources: using the wrong needle type (e.g., a sewing needle instead of an embroidery needle), a dull needle, incorrect threading, or improperly wound bobbins. Ensuring you use embroidery-specific needles and always thread the machine with the presser foot up can significantly reduce this. Double-checking that your bobbin is wound evenly and placed correctly in the bobbin case is also crucial.
Another frequent challenge is puckering or shifting of the fabric within the hoop, leading to distorted designs. This is primarily avoided by ensuring the fabric is hooped tautly and evenly, without wrinkles, and that the correct stabilizer is used for the fabric type and design density. For lightweight or stretchy fabrics, using a heavier stabilizer or even a temporary adhesive spray can provide the necessary stability. Lastly, skipped stitches can occur due to lint buildup, incorrect needle insertion, or using low-quality thread. Regularly cleaning the machine as outlined previously, ensuring the needle is fully inserted and correctly oriented, and using reputable thread brands can effectively prevent this issue.
Final Thoughts
Selecting the best starter embroidery machines necessitates a thorough understanding of individual needs and project aspirations. Key considerations revolve around user-friendliness, essential features such as stitch count and hoop size, and the availability of robust customer support and online communities. Beginners should prioritize machines offering intuitive interfaces, pre-loaded designs, and straightforward threading mechanisms to facilitate a smooth learning curve. Furthermore, investing in a machine with a reasonable stitch speed and an adequate hoop size will allow for greater creative expression without immediate limitations.
The market presents a diverse range of options, from compact, portable models perfect for small embellishments to more feature-rich machines capable of handling larger, more intricate designs. Ultimately, the “best” starter embroidery machine is the one that aligns most closely with your budget, the types of projects you envision, and your willingness to engage with the learning process. We recommend that prospective buyers thoroughly research machine specifications, read independent reviews, and, if possible, test machines at local craft stores to gauge ease of use and build quality before making a purchase.